Have you tried importing from Excel into InDesign? In Book Design Made Simple we walk you through importing tables from Word, but importing a spreadsheet from Excel is a bit different so we’ll walk you through it here. And, because spreadsheets and tables rarely import into InDesign looking like they did in Excel and Word, we’ll give you a few tips on the easiest way to get started.
To import your Excel spreadsheet into an InDesign document, first open your InDesign document and choose the Selection Tool. Click anywhere outside of any existing text or image frames to make sure nothing is currently selected. Choose File>Place (or use the keyboard shortcut Ctrl/Cmd+D), then browse to select your Excel file. Make sure the Show Import Options box is checked, then click Open.

Next you’ll see the Microsoft Excel Import Options dialog box. The settings shown below are the default settings, and they are fine. Your Cell Range will be different than shown below, but no need to worry about it. Click OK.

Now your mouse pointer will be loaded with your Excel spreadsheet. You want the spreadsheet to be separate from your other text frames for the time being, so click anywhere on a blank page or on your pasteboard to place the spreadsheet. Voila! You’ve successfully placed your Excel spreadsheet in InDesign. Note that your spreadsheet has now become an InDesign table. That’s right, whether you placed a table from Word or a spreadsheet from Excel, it is converted into a table in your InDesign document.
So … you’re done, right? Well, not exactly.
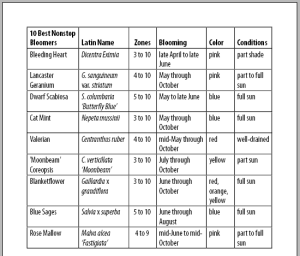
Don’t be discouraged if your table looks like a disaster in InDesign! We’ve imported a very simple Excel spreadsheet as an example, and you’ll see below that all of our bold and italic formatting has been lost, the columns are different widths than they were in Excel, the text frame is a different size than the table, and there is overset text (some rows at the bottom that don’t show). So, what to do?

We’ve explained how to lay out and typeset tables in Book Design Made Simple (pages 342 through 347), but if you don’t have the book in front of you, you can use these steps to format a simple table.
First, get the text frame lined up on your page by dragging the whole frame onto your page and then adjusting the edges of the text frame to line up on your margins. You’ll notice that changing the size of your text frame doesn’t change your table at all; it simply aligns the frame on the page.

Next you’ll work on the table itself, to get it looking just right. You might assume that you’ll use the Selection Tool to resize your table, but actually you’ll use your Type Tool for absolutely everything to do with your table from now on. So switch to your Type Tool and spend a few moments experimenting with selecting rows, columns, and the whole table, as this will be useful later on.
Start by hovering your Type Tool at the top left corner of your table, and you’ll see a black arrow pointing diagonally down to the right. Click with the diagonal arrow showing, and you’ll select the whole table (it’ll look black). Next run the Type Tool along the top edge of the table, and you’ll see a black arrow pointing down. Click with the down arrow showing, and you’ll select a column (or click and drag to the left or right, and you’ll select a number of columns). And finally, run the Type Tool along the left edge of the table, and you’ll see a black arrow pointing right. Click with the right arrow showing, and you’ll select a row (or click and drag up or down, and you’ll select a number of rows).
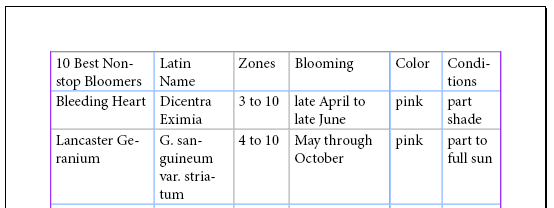
Now try changing the width of a column by hovering your Type Tool over a vertical line between two columns. When the small double arrow appears, click and drag to the left or right to change the width of that column. The first adjustment you can make to your table is to get the columns to fit within the page margins. So go ahead and make all your columns a suitable width for the text they contain, and bear in mind that you’ll be fine-tuning the fonts later so no need to be too fussy. Below you’ll see more suitable column widths in our example table, and that all the columns now fit into the page margins.
Next create a header row for your table. If your table happens to flow onto more than one page down the road, the header row will appear at the top of the table on each and every page. Do this now by opening your Table panel (click Window>Type & Tables>Table). Click the fly-out menu on the Table panel and choose Table Options>Headers and Footers. Change Header Rows to 1, choose Once per Page in the Repeat Header drop-down menu, then click OK.

You’ll see that InDesign has created a new blank row at the top of your table, and this is your new header row. You’ll need to select the row that was at the top a second ago (now your second row, with all your column heads in it), copy that row (Ctrl/Cmd+C), then select the new header row and paste the text in (Ctrl/Cmd+V). Now delete the second row by selecting it again and pressing Ctrl/Cmd+Backspace. It seems like a lot of extra work to create a header row, but now is the easiest time to set it up, and it’s done!
Next create two new paragraph styles, one for table body text (tb) and one for table column heads (tch) (see BDMS, page 344). The tb style can be a point size or two smaller than the main narrative in your book, and the tch style can be the same font size as tb in bold. Just start by creating those two paragraph styles and apply them to the text in your table. To apply them, select the top row of the table (the “header” row) as explained above, then apply your tch paragraph style to it. Then select all the remaining rows in your table, and apply the tb paragraph style to them.
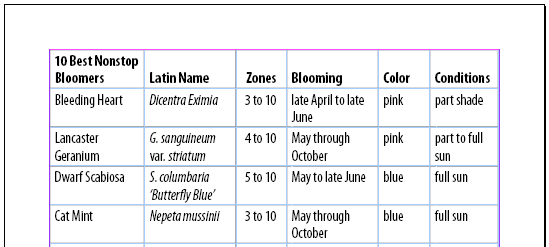
Once that’s done, you can adjust the fonts and font sizes within those two paragraph styles to find the perfect size for your table text (open a paragraph style and make sure the Preview box at the bottom left is checked so you can see changes in real time). If you have a lot of text to fit in a narrow width, consider using a condensed font. You might also consider using a sans serif font for your tables, to contrast with a serif font in the main narrative of your book. In the example below, we’ve used Myriad Condensed for body text and Myriad Bold Condensed for column heads, and the text fits much better.

Now that you’ve settled on a font and type size, you can fine-tune your column widths (as explained above), fix any typos, and apply italics or any other formatting that was lost. To change the text in any table cell, simply select the text with your Type Tool and make the changes needed. Below you’ll see we’ve applied italics, fixed a typo, and fine-tuned our column widths.

 Using the Table panel to polish your table
You’ll need your Table panel to really polish your table, so open that now by clicking Window>Type & Tables>Table. The top half of this panel controls the number and sizes of your rows and columns, and the bottom half controls what’s going on in the cells (and that’s the useful part for you at this stage).
By default, all the text in your table cells is aligned to the left and top of the cells. You may not always want that! In our example, one of the column heads runs to two lines, so all the other heads have a blank line underneath. It’ll look nicer to align the column heads to the bottom of their cells, rather than the top. To change this, first select your header row, then click the Align Bottom icon in the Table panel (it’s to the right of the Align Top icon which is currently selected, and the names of the icons will appear while you’re hovering over them).
Also, some columns look nicer when the text is centered horizontally or right aligned in the table cells, rather than left aligned. To make this change, select the cells you want to adjust by dragging the Type Tool over them, then choose Align Center or Align Right from Control panel at the top of your screen (as shown below). Note that your Control panel also contains many of the same icons as your Table panel, so feel free to use whichever suits you best.

In our example below, we’ve adjusted the header rows so they align at the bottom of their cells, and centered the whole “Zones” column. The table is starting to look better!
Next change from Normal mode to Preview mode (switch to your Selection Tool and then press W), to see what your table will actually look like in print. You’ll probably find your cells have a black stroke applied to all four sides, as that is InDesign’s default setting:

If you’re satisfied with how your table looks, then you’re good to go! You may want to add your table into your main narrative’s flow of text and, if so, simply select the whole table with your Type Tool and copy it (Ctrl/Cmd+C), then click your Type Tool in an appropriate place in your main narrative so your cursor is flashing there, and finally, paste the table in (Ctrl/Cmd+V). If your table has more rows than will fit on one page, or if you’ve placed it near the bottom of a page, the table will break at the closest row to the bottom of the page, and continue at the top of the following page.
We hope our set of three blog posts about setting up tables in InDesign will help you get started with your own tables.
This blog post explains:
Tables can be tricky at first, but we hope this helps to simplify importing Excel spreadsheets and working with tables.
Book Design Made Simple. You can do it yourself.
Hi, Im looking to find something that I forgot how to do and that is to import some cells/columns from excel to Indesign but not others. So skipping a column because its the overall total, but I only want lets say per meal.
In the Cell range I know you can type A6:E11 but I also want to add G12:H13 for example. How do I do this the easiest.
I also found a page where you can name the sections
https://creativepro.com/easier-import-of-complex-excel-spreadsheets/
but I will not let me skip a column when naming them 🙁
Help would be much appreciated, it helps a lot when you are making price lists 🙂
Hello Mette,
Thanks for your interesting question. We both worked on this, trying ways to include only certain cells in the range (with no luck), and we’ve concluded that your best solution will be to hide columns while you’re in Excel. You do this by highlighting whatever columns you do NOT want to include, right clicking, and selecting Hide. You’ll then see those columns disappear. Choose a new file name for the resulting table.
Then you can import the new table as usual.
We hope this works pretty smoothly for you.
If you (or any of our other readers) find a better way, please do let us know.
Glenna
I know this post is several years old, but WOW, what a help. It’s so easy to follow and I love the words and the visuals as cross checks. This book is now on my list. Signing up to follow you. THANK YOU!